Your roof is one of the most important parts of your home, providing protection from the elements while enhancing energy efficiency and curb appeal. However, to ensure your roof is in peak condition, regular inspections are a must. At RC Roofing in Washington, MO, we work with homeowners in Washington, Wildwood, Frontenac, Town & Country, Chesterfield, Eureka, Augusta, Union, and Pacific to deliver comprehensive inspections. If you’ve never scheduled one, you may be wondering what to expect during the roof inspection process. This guide breaks it down step by step so you know exactly what’s involved and why it matters.
Why the Roof Inspection Process Matters
The roof inspection process is designed to identify potential issues before they become major problems. From minor leaks to storm damage, a professional inspection ensures your roof is functioning as it should. Whether you’re preparing for a home sale, recovering from a storm, or conducting routine maintenance, inspections protect your home and your wallet by preventing costly repairs.
Key Benefits of a Professional Roof Inspection
- Prolong Roof Lifespan: Identifying and addressing minor issues can extend the life of your roof.
- Prevent Leaks: Early detection of damaged shingles, flashing, or seals prevents water damage.
- Storm Damage Assessment: After a storm, a professional inspection can document damage for insurance claims.
- Increase Energy Efficiency: A well-maintained roof helps regulate indoor temperature, reducing energy bills.
- Peace of Mind: Knowing your roof is in good condition eliminates worry about hidden problems.
Overview of the Roof Inspection Process
When you schedule an inspection with RC Roofing, you can expect a detailed and thorough examination of your roof. Here’s an outline of the roof inspection process:
- Initial Consultation and Preparation
- Exterior Roof Inspection
- Interior Roof Inspection
- Damage Assessment
- Comprehensive Report and Recommendations
Each of these steps is critical to ensuring a complete understanding of your roof’s condition.
Step 1: Initial Consultation and Preparation
Before the inspection begins, your roofing contractor will discuss your concerns, such as leaks, storm damage, or aging shingles. If there are specific areas of concern, mention them during this initial conversation. For example, homeowners in Washington and Eureka often call us after storms, while those in Chesterfield or Wildwood may request inspections before putting their home on the market.
The contractor will also review the age of your roof and any previous repairs or replacements. This step ensures the roof inspection process is tailored to your specific needs.
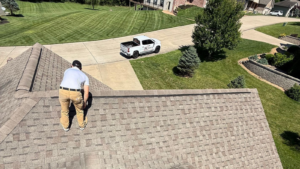
Step 2: Exterior Roof Inspection
The exterior inspection is one of the most crucial parts of the roof inspection process. Using a ladder and safety equipment, the contractor will assess the outside of your roof, focusing on the following key areas:
Shingles and Roofing Material
The inspector will check for missing, cracked, curled, or loose shingles. For metal or tile roofs, they’ll look for signs of rust, dents, or cracks. These issues can lead to leaks and reduced roof performance if left unaddressed.
Flashing and Seals
Flashing is the material installed around vents, chimneys, and roof edges to prevent water from seeping underneath the roofing material. Damaged or corroded flashing is a common problem that can lead to water leaks.
Gutters and Drainage
Proper drainage is essential to avoid water pooling on your roof or near your home’s foundation. The contractor will check for clogged or damaged gutters, as well as ensure that downspouts are properly directing water away from your home.
Roof Structure
Sagging or uneven areas in the roof structure can indicate deeper issues, such as water damage or structural weakness. Your inspector will note any areas of concern during this part of the roof inspection process.
Moss, Algae, or Debris
Moss and algae growth, as well as debris buildup, can compromise your roof’s performance over time. Your contractor will inspect for these issues and recommend solutions, such as roof cleaning or applying a protective treatment.
Step 3: Interior Roof Inspection
After examining the exterior, the roof inspection process moves indoors. The attic is a critical part of this step, as it provides insight into potential roof issues that may not be visible from the outside.
Insulation and Ventilation
Proper attic ventilation and insulation are essential for preventing moisture buildup and regulating indoor temperature. Poor ventilation can cause heat and moisture to become trapped, leading to roof damage, mold growth, and higher energy bills.
Signs of Leaks or Water Damage
Your inspector will look for water stains, damp insulation, or mold growth that may indicate leaks. Catching these signs early is key to avoiding extensive interior damage.
Structural Integrity
The contractor will assess the rafters and roof decking for signs of sagging, cracks, or rot. These issues can compromise the roof’s overall structure and require immediate attention.
Step 4: Damage Assessment
Once the exterior and interior inspections are complete, the contractor will compile a list of any damage or areas of concern. This step of the roof inspection process is critical for homeowners in storm-prone areas like Union and Pacific, as it helps document issues for insurance claims.
Types of Damage Often Found in Washington, MO, Homes
- Hail Damage: Dents or cracks in shingles caused by hailstorms.
- Wind Damage: Missing or loose shingles due to high winds.
- Moisture Damage: Leaks or water stains from improperly sealed vents or flashing.
- Ice Dams: Common in winter, ice dams can cause water to back up under shingles and into your home.
Your contractor will provide photos and detailed notes about the damage to help you understand the condition of your roof.
Step 5: Comprehensive Report and Recommendations
The final step in the roof inspection process is the delivery of a comprehensive report. This document includes:
- Summary of Findings: A detailed overview of your roof’s current condition.
- Photos and Documentation: Visual evidence of any damage or areas of concern.
- Recommendations: Suggestions for repairs, maintenance, or replacement, depending on the severity of the issues.
- Cost Estimates: If repairs are needed, your contractor will provide a breakdown of costs and timelines.
For homeowners in areas like Frontenac and Town & Country, this report is especially valuable when planning repairs or negotiating with insurance companies.
When Should You Schedule a Roof Inspection?
To maintain the integrity of your roof, we recommend scheduling a professional inspection:
- Annually: Routine inspections help catch small issues before they become major problems.
- After Severe Weather: Hail, wind, or heavy snow can cause significant damage that isn’t always visible from the ground.
- Before Buying or Selling a Home: A roof inspection is essential for identifying potential issues and negotiating repairs.
- If You Notice Signs of Damage: Water stains, missing shingles, or sagging areas are clear indicators that an inspection is needed.
How RC Roofing Serves Homeowners in Washington, MO, and Beyond
At RC Roofing, we understand that every home is unique, which is why our roof inspection process is tailored to the needs of homeowners in Washington, Wildwood, Frontenac, Town & Country, Chesterfield, Eureka, Augusta, Union, and Pacific. Whether you’re preparing for a stormy season or planning to sell your home, our experienced team delivers thorough and professional inspections you can trust.
Maintaining Your Roof for the Long Term
Regular maintenance is essential to ensure your roof reaches its maximum lifespan, regardless of the material. Wisconsin homeowners can take several steps to enhance roof longevity in Wisconsin effectively. Keeping gutters clean is crucial, as clogged gutters can cause water to pool on the roof, increasing the risk of leaks and ice dams. After severe weather, it’s important to inspect the roof for any loose or damaged shingles, flashing, or vents that might need attention. Trimming overhanging tree branches is another preventive measure, as these branches can scratch roofing materials or cause damage if they fall during storms.
Additionally, addressing ice dams is vital—this involves removing snow from the roof and ensuring proper attic insulation to prevent their formation. Finally, scheduling regular professional inspections can help identify potential issues early, allowing for timely repairs and ensuring roof longevity Wisconsin homeowners can count on.
Conclusion
A professional roof inspection is an essential part of maintaining your home’s safety, energy efficiency, and curb appeal. By understanding the roof inspection process, homeowners in Washington, Wildwood, Frontenac, Town & Country, Chesterfield, Eureka, Augusta, Union, and Pacific can take proactive steps to protect their roofs and avoid costly repairs.
At RC Roofing, we’re committed to providing detailed inspections and expert recommendations to help you get the most out of your roof. Contact us today to schedule your inspection and ensure your roof is ready to withstand whatever Missouri’s weather throws your way.