Roof inspections often include detailed photos taken by roofing professionals. These images help homeowners understand the condition of their roof and identify areas that may require repair or maintenance. However, many homeowners are unsure how to interpret these images or what they should be looking for.
Learning how roof inspection photos explained by professionals reveal potential issues can help homeowners make informed decisions about roof maintenance and repairs. Inspection photos provide visual evidence of roof conditions that may not be visible from the ground.
At RC Roofing, we provide detailed inspection reports with clear photographs so homeowners in Washington, Wildwood, Frontenac, Town and Country, Chesterfield, Eureka, Augusta, Union, and Pacific can understand exactly what is happening on their roof. This guide explains how to read roof inspection photos, what common issues look like, and how these images help identify potential roofing problems.
Why Roof Inspection Photos Are Important
Roof inspection photos provide a visual record of the condition of your roofing system. These photos allow homeowners to see the exact areas where damage or wear may be developing.
Because most homeowners cannot safely access their roof, inspection photos act as a window into parts of the roof that are otherwise difficult to evaluate.
Understanding roof inspection photos explained by a professional helps homeowners see what roofing contractors see during inspections.
These photos are also useful for documenting roof conditions for insurance claims, repair planning, and maintenance records.
What A Typical Roof Inspection Photo Report Includes
Most professional roof inspections include multiple photos taken from different areas of the roof.
These images often highlight key roofing components such as shingles, flashing, vents, gutters, and roof valleys.
Roof inspection photos explained in reports usually include close up images of potential issues along with overview photos showing the condition of the roof surface.
Some reports may also include drone photography or aerial views that provide a broader perspective of the entire roof system.
Each photo helps illustrate specific conditions that may require attention.
Understanding Shingle Condition In Inspection Photos
Shingles are one of the most commonly photographed components during a roof inspection.
Roof inspection photos explained often highlight signs of aging shingles, cracked shingles, curling edges, or missing shingles.
Inspectors may take close up photos of shingle surfaces to show granule loss. These granules protect shingles from weather exposure and ultraviolet damage.
If inspection photos show excessive granule loss, this may indicate the roof is approaching the end of its lifespan.
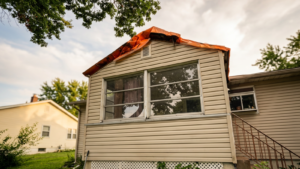
Photos of lifted or damaged shingles may also reveal areas where wind damage has occurred.
Identifying Missing Or Damaged Shingles
Missing shingles are easy to recognize in inspection photos because the underlying roofing materials may be visible.
Roof inspection photos explained in reports often mark these areas to show where protective layers are exposed.
Damaged shingles may appear cracked, torn, or bent.
Even a small number of missing shingles can allow water to enter the roof system.
Inspection photos help homeowners understand why repairs are necessary before leaks begin.
Recognizing Granule Loss In Roof Photos
Granule loss appears as dark or shiny areas on shingle surfaces.
Roof inspection photos explained by contractors often zoom in on these sections to show where protective granules have worn away.
Granule loss can occur naturally as shingles age, but severe loss may indicate storm damage or advanced roof deterioration.
Exposed asphalt beneath the granules can lead to faster shingle aging.
These photos help homeowners understand when shingle replacement may be needed.
What Roof Flashing Problems Look Like In Photos
Flashing protects areas where the roof meets chimneys, vents, or walls.
Roof inspection photos explained during inspections often highlight flashing because it is one of the most common sources of leaks.
Photos may show rusted flashing, lifted edges, or separated flashing joints.
Improperly installed flashing may also appear uneven or poorly sealed.
These images help homeowners understand how flashing damage can lead to water intrusion.
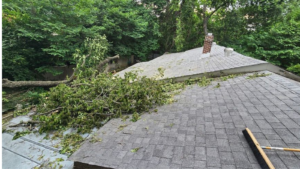
How Roof Valleys Appear In Inspection Photos
Roof valleys are the areas where two roof slopes meet. These areas carry a large amount of rainwater during storms.
Because of this, inspectors frequently photograph valleys during roof inspections.
Roof inspection photos explained often show debris buildup, shingle wear, or flashing issues within these valleys.
Valley damage may appear as cracked shingles, exposed underlayment, or uneven shingle alignment.
Maintaining valleys is essential for proper roof drainage.
Spotting Roof Vent Issues In Inspection Photos
Roof vents allow air to circulate through attic spaces, helping regulate temperature and moisture levels.
Roof inspection photos explained may include close up images of vent covers, vent flashing, and surrounding shingles.
Damaged vents may appear dented, rusted, or improperly sealed.
In some cases, inspectors may photograph cracked vent boots or deteriorated rubber seals around vent pipes.
These issues may allow water to enter the roof system.
Identifying Gutter And Drainage Problems
Gutters play an important role in directing water away from the roof and foundation.
Inspection photos may show clogged gutters, sagging sections, or improper drainage angles.
Roof inspection photos explained in reports may highlight debris buildup that prevents water from flowing properly.
Overflowing gutters can cause water to back up beneath roofing materials.
Addressing drainage problems helps prevent moisture damage.
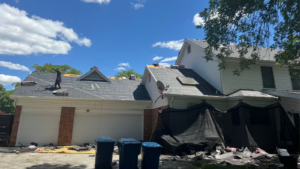
Signs Of Storm Damage In Roof Photos
Missouri storms can cause several types of roofing damage.
Roof inspection photos explained after storms may show hail impacts, torn shingles, or displaced roofing materials.
Hail damage often appears as circular marks or dents on shingles.
Wind damage may be visible as lifted shingle edges or missing sections.
Inspectors document storm damage with photos to support insurance claims and repair recommendations.
Understanding Moss And Algae Growth
In humid environments, roofs may develop moss or algae growth.
Roof inspection photos explained may show dark streaks or green patches on shingles.
While algae may not immediately damage the roof, moss growth can trap moisture against roofing materials.
Over time, trapped moisture can weaken shingles and shorten roof lifespan.
Photos of moss growth help homeowners understand why roof cleaning or maintenance may be recommended.
How Roof Deck Problems Appear In Photos
In some cases, inspectors may photograph areas where roof decking appears soft or uneven.
Roof inspection photos explained may show sagging roof sections or areas where shingles appear sunken.
These signs may indicate moisture damage beneath the roof surface.
Soft decking often requires repair or replacement before new roofing materials can be installed.
Identifying these issues early prevents larger structural problems.
Why Attic Photos May Be Included In Inspection Reports
Roof inspection reports sometimes include attic photos.
These images help inspectors identify moisture stains, mold growth, or ventilation issues.
Roof inspection photos explained from inside the attic often show water marks on roof decking or insulation.
Attic images help determine whether moisture is entering through the roof or forming from condensation.
These insights help contractors recommend appropriate repairs.
Drone Photography In Roof Inspections
Many modern roof inspections include drone photography.
Drones allow inspectors to capture high resolution images from angles that are difficult to reach safely.
Roof inspection photos explained through drone images often provide full roof views that highlight overall roof condition.
These aerial perspectives help identify uneven wear patterns or storm damage across larger sections of the roof.
Drone photography improves inspection accuracy.
How Inspection Photos Help Plan Repairs
Roof inspection photos are not only used to identify problems but also to plan repairs.
Photos help contractors determine which areas require replacement, sealing, or reinforcement.
Roof inspection photos explained in repair estimates often include markings or notes that show the exact location of damage.
This helps homeowners understand the scope of recommended repairs.
Clear visual documentation builds trust and transparency between contractors and homeowners.
Importance Of Professional Roof Inspections
While inspection photos are valuable, interpreting them correctly requires roofing knowledge.
Professional contractors understand how to evaluate roofing materials and identify damage patterns.
Roof inspection photos explained by experienced inspectors provide accurate insight into roof health.
Professional inspections ensure that homeowners receive reliable recommendations.
This helps prevent unnecessary repairs while addressing real issues.
How Often Homeowners Should Review Roof Inspection Photos
Homeowners should schedule roof inspections regularly to maintain roof condition.
Annual inspections are recommended, especially after severe weather.
Reviewing roof inspection photos explained in inspection reports helps homeowners monitor changes over time.
Comparing photos from previous inspections can reveal developing issues.
Regular documentation helps homeowners plan maintenance and budget for future repairs.
Why Local Roofing Expertise Matters
Local roofing professionals understand the weather conditions that affect Missouri homes.
Storm patterns, seasonal temperature changes, and humidity levels all influence roofing performance.
Our team provides roof inspection photos explained clearly so homeowners understand the condition of their roofing system.
Local experience helps ensure accurate inspections and reliable repair solutions.
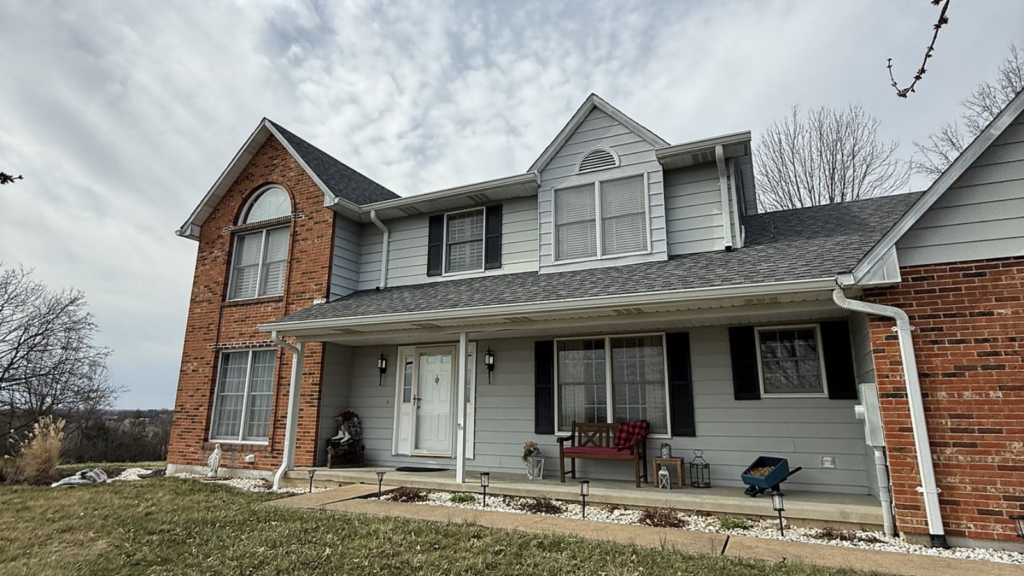
Protect Your Home By Understanding Roof Inspection Photos
Your roof protects your home from storms, moisture, and environmental exposure. Understanding what inspection photos reveal allows homeowners to take a proactive approach to roof maintenance.
Roof inspection photos explained in professional reports provide valuable insight into roofing conditions that may otherwise go unnoticed.
By learning how to interpret these images, homeowners can better understand their roof’s health and address potential issues before they become costly repairs.
Regular inspections combined with professional guidance help maintain a strong and reliable roofing system.
Schedule A Roof Inspection With RC Roofing
If you want a clear understanding of your roof’s condition, a professional inspection is the best place to start.
RC Roofing proudly serves homeowners in Washington, Wildwood, Frontenac, Town and Country, Chesterfield, Eureka, Augusta, Union, and Pacific.
Our experienced team provides detailed inspection reports with roof inspection photos explained clearly so you can see exactly what is happening on your roof.